
Shedding Light on Lightroom's Export Options
A guide to image export options: resizing and JPEG quality
Resolution, PPI, JPEG Quality, Resizing…. There’s no discrimination when it comes to being confused by image export options; this collection of concepts baffles new photographers and professionals alike. This post aims to de-mystify the options in Lightroom’s File Settings and Image Sizing panels within the Export Dialog.

Image Sizing: Resizing your image
Why do you need to resize an image? It’s usually because some platforms like the web and Facebook do not display images at full resolution, so you might as well use an image that better fits how it will be displayed.
A bit about resolution and display size
The resolution of an image is the size in pixels of its horizontal and vertical edges, usually expressed as something like 6016px x 4014px. The other important factor is the display size – the number of pixels that the image will occupy on the screen that it’s displayed on. How these two relate is very important:

Just Right: If image size is the same as the display size then this is perfect. There is no wasted data and the image will not need to be stretched so will be perfect quality. If you know that your image will be rendered at a fixed, known size, then this is perfect. But in many cases, like on a website, your image will be rendered differently on different devices so it’s not possible to always match these two.
Larger Images: If image size is larger than the display size, then that’s fine too. The website or social media platform will ensure to display it at the right size in any case, and so as long as you make the image larger than the perfect size above then there will be no loss in quality. Taken to the extreme though, if you’re using a 42MP image for a web page that will display it at 800x400 pixels, then you are using a huge amount of data unnecessarily which impacts storage and speed of the website with no visible gain.
Smaller Images: If image size is smaller than the display size then you are in trouble. The image will either be rendered too small, or it will be ‘stretched’ to fit which will reduce the sharpness in your image.
For me, for all electronic uses I assume that most devices are smaller than 2500 pixels wide (my monitor size) so I resize them to that size which is a good balance in the list above. But don’t stress about it - it doesn’t really matter if your images are larger than this as they will be displayed the right size Facebook or Instagram and most website platforms ensure this too as they simply fit the image to a container that’s designed to make the site look good. Gone are the days where the image size on the web depends on it’s resolution.
Yes, you can go a step further and give Facebook the exact size it needs (2048 pixels wide) but it’s not technically necessary. There is a theory that this will mean that Facebook will not need to re-size your image and you will get the best quality. But 1) If Facebook DOES need to reduce the size you can guarantee they will do just as good a job as Lightroom and 2) Facebook will always compress the images so your photo will never be used ‘as is’.
Lightroom Image Sizing Options
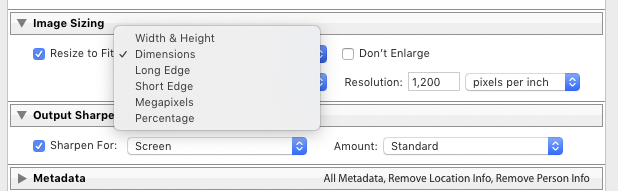
This section allows you to change the size of your exported image to make it smaller than the Full resolution version you have in Lightroom. Resizing can be done a number of ways:
Width & Height: When you know exactly what dimensions you want. You will need to manually ensure your aspect ratios remain correct though. If not, it will simply change the Height value (rather than crop or stretch the image)
Dimensions: No-one knows what this does or how it’s different from above. No one I tell you!
Long Edge: You tell Lightroom what size you want your longest edge (horizontal for landscape, vertical for portrait images) and it will sort it, ensuring the smaller edge is correct for the aspect ratio in the image. This is the most useful for me.
Short Edge: As above, but with the shorter edge
Megapixels: You tell Lightroom how much data you want in the image and it will shrink it to fit that requirement. Can’t think why you would want this.
Percentage: Useful if you want to make all images smaller by the same proportion, but be careful as it will do different things with different size images.
If you specify a size larger than the original image, then Lightroom can increase the size for you. Again, careful with this as you are not gaining any more photo, just ending up with a stretched image. It does this with an algorithm that will look at two original pixels and interpolate what might have been between them and puts that value there. In doing this, it softens edges.
Resolution… well….
Resolution is the most misunderstood setting on this panel. The thing to remember is this: When you have specified ‘pixels’ in the above options to resize your images, then this option does nothing. Nothing at all. For all electronic use, and 99% of print uses it’s irrelevant. You can test this: export an image at 3000 x2000 pixels (or whatever) with both a resolution of 1 and 1000, they are exactly the same in every way. I think it should be greyed out when you are dealing with pixel values (i.e. always) as it confuses people.

So when DO you need the resolution setting? Good question, the answer is: generally never. I’ve never used it. The theory goes that you might want to resize your image to be a specific physical size on a display, with the image displayed at 1:1 (no stretching or shrinking). Fine, in this case you can simply tell Lightroom that you want your image to be 10 Inches wide. But ‘1o Inches’ is meaningless unless you know how many pixels fit in an inch on the device it will be displayed on, and this is where the Resolution field comes in. If you know your display is 200 PPI (Pixels Per Inch) then Lightroom will automatically make the image 2000 pixels wide to get your specified size. So the only use of this field is for Lightroom to make this calculation (as it does not know your device type).
Printing. What about printing though…
In practice you never need to do this. If you are using an online printing service like Loxley, Photobox, Shootproof or any other that exists on the planet, then you send your full resolution image, and tell them the size of the print you want during the ordering process. All the effort of working out how to get the right size is now their problem. If you are OBSESSED with not sending the full size image to your online print service to save you 0.5 seconds in upload time then you can use PPI to work out the minimum size image in pixels you need to send. Photobox.com for example use a PPI of 254. So if you want to print at 10 Inches wide then technically images over 254 x 10 = 2540 Pixels is all you need to send. The Resolution option in Lightroom saves you doing the maths and is ONLY used when you have selected Inches or CMs rather than Pixels. But honestly, just send the full size.
Note. PPI is NOT the same as DPI. They are totally unrelated, but confusion happens as they are incorrectly used interchangeably often. DPI is a technical term that describes how many dots a printer can make in an inch. Not Pixels, but physical dots of ink.
File Settings: Format and Quality
There are a variety of options for Image Format. There are options to export a DNG (Adobe’s RAW format) or TIFF (very high quality), but generally the most common option is JPEG.
Some image formats allow compression so that the resulting file is smaller in data size (great for upload/download times and storage). This compression can be either lossless or lossy:
Lossless: There is no loss of data at all. Size savings are limited (TIFF, DNG, PNG, BMP)
Lossy: Some data is thrown away, giving much smaller file sizes (JPEG)
JPEG Format and Options

JPEG is the most popular image format. It uses lossy compression to make images much smaller. The JPEG algorithm re-encodes the image in a way that allows it to throw away varying amounts of data, and it does so cleverly so that the data lost is the data that we are least sensitive to. It does this by converting the image from the RGB, pixel values, into a huge set of frequencies. This gets very complicated (happy to explain if anyone wants me to) but it means that you can get rid of certain frequencies in the image without us noticing. Typically this starts with the higher frequencies which represent the ‘edges’ around things in the photo. This is why an over-processed JPEG has halos around the edges.

The algorithm has a ‘Quality Value’ that allows you to decide how much data to throw away, and you choose this based on how small you want your file to be. If you choose 100 it will be at maximum quality, but still smaller than the original image file. At the other end, setting quality to 20 where you have a tiny image but it will not look good and have lots of blocky artefacts and edge distortion. The idea is to get a balance. Between 75-90 gives a good tradeoff.
Just like it provides you two ways to determine pixel size (absolute, or physical size and resolution) Lightroom allows you to determine the quality value by setting the desired file size instead. If you tick ‘Limit File Size To’ then the slider is not used. In this case it will decide the quality value needed to get to that file size. This is my favourite option. I know 400KB files will load quickly on my website, so I let JPEG Algorithm do what it needs to to get that file size. For delivery and printing I use a quality of 90 and no file-limit. People with more time on their hands than me have worked out that anywhere up from 90 is indistinguishable but gives you larger file size.
JPEG Mini is a tool to get even more reduction on file size. JPEG Mini has a more intensive, more intelligent algorithm that can compress the ‘already JPEG compressed’ image to half the size. The designers at JPEG mini have found a bunch of data that’s left out in the JPEG algorithm (which was to be fair invented in 1992). It throws away even more data, but in a way that’s cleverer than the standard JPEG algorithm, and the images still look identical and most pros I know have JPEG mini as part of their day-to-day workflows. Beware of editing these though… see below.
resize and JPEG Ordering
Always resize your image first, before you convert to JPEG - for most of us Lightroom handles all this in the export process. Do JPEG conversion just once, and then run through JPEG mini if you have it. Do not then resize. If you do, you are then re-encoding a JPEG from an image that was already stretched to the point of having only just enough data. Yes this might give you an extra saving on file size, but it will be at the expense of quality in the final image. If you want a smaller image file size, reduce the quality setting in the Export dialog so you just do the process once.
Never Edit a JPEG!
When an image has been compressed to JPEG, even though it looks the same, it has only a fraction of the data. It looks the same because JPEG is clever and knows that it can ditch loads of the image without us noticing too much. If you edit it now, you are going to find that it looks awful because you are trying to manipulate data in the image that is no longer there. This is easiest explained with an example: You have an raw image, edited in Lightroom so that you have a large area of dark around your subject. We know that in Lightroom we can raise the shadows to bring detail into those dark areas. However, during conversation to JPEG, the algorithm knows that you can’t see detail in those shadows and removes the data. So if you try to edit the JPEG by lifting shadows, you get a mushy mess, because the data is gone. So just remember by converting to JPEG you are losing the ability to edit it. If you need to do anything other than tweak brightness, go back to the original.