
Adobe Lightroom Image Export Options
Adobe Lightroom Image Export Options
Resolution, PPI, JPEG Quality, Resizing…. There’s no discrimination when it comes to being confused by image export options. They baffle new photographers and professionals alike.
They’re all brought together in Adobe Lightroom’s Export Images Dialog Box, and getting these settings wrong means you’re not producing the high-quality images that your work deserves.
Adobe Lightroom Image Export Options - argh, my brain!…
This article helps clarify these concepts so that the correct export options are no longer a hit-or-miss affair. Even if you’re not interested in the technicalities, there’s a ‘cheat sheet’ at the end which will tell you my recommended settings for various online and print usages.
Image Resizing
Why do you need to resize an image? It’s usually because most platforms on the web and social media don’t display images at full resolution. You might as well use an image that’s the right size, which will save upload time and storage space.
Another reason is that some websites will deliver the image to the viewer’s device at the same resolution it was uploaded, letting the client device scale it correctly. If it’s too big, it can reduce your website’s performance and SEO.
The resolution of an image is the size in pixels of its horizontal and vertical edges, usually expressed as something like 6016x4014px. The other important factor is the display size – the number of pixels that the image will occupy on the screen that it’s displayed on. How these two relate, and avoiding a mismatch, is key:

Just Right: If image size is the same as the display size then there is no wasted data and the image will not need to be stretched, so it will be high quality. If you know that your image will be rendered at a fixed, known size, then this is great. But in many cases, like on a website, your image will be rendered differently on different devices, so it’s not possible to always match these two.
Larger Images: If image size is larger than the display size, this is usually OK, as the website or social media platform will usually ensure it’s displayed at the right size. Taken to the extreme though, if you’re using a 42MP image for a web page that will display it at 800x400px, then you are using a huge amount of data unnecessarily. That impacts storage and speed of the website, with no visible gain. Some website platforms such as Squarespace automatically create smaller versions of your images to try to minimise this problem.


Smaller Images: If image size is smaller than the display size then you’re in trouble. The image will either be rendered too small, or it will be stretched to fit, which will reduce the sharpness in your image.
Resolution: DPI & PPI
A note about these concepts. They are incorrectly used interchangeably all the time, but they are very different things. Also, thankfully, most of us photographers can totally ignore them as they relate to how images are displayed or printed.
PPI simply relates to the resolution of a display device, not an image. It refers to how many pixels a screen has in an inch of display real-estate. If you know this, then you can use this information to control how to resize your image so that it’s presented at the right physical size (in inches or centimetres).
So, rather than specify a pixel-resolution, you can specify an image size and the PPI. These are just different ways to represent the number of pixels in an image.
When would you need specify resolution this way? Generally never, because your friendly neighbourhood printer will print at the size you ask them to. Honestly, ignore it.
DPI (Dots Per Inch) is simply the smallest resolution a printer can print at. This is only of interest to printers and printing companies. Good news; you can generally ignore this too.
Recap: For all electronic displays of your image, PPI is almost always irrelevant.
Image Compression
Data compression reduces the number of bytes used to store or transmit that data, with acceptable loss in quality.

Compressing an image aims to reduce the physical amount of data the file uses and is totally unrelated to the resolution or size of the image. Still, it’s key to the quality of that image. You can have a 24MP-resolution image that’s over-compressed with low quality and looks dreadful, and you can have an image resized to 3MP and lightly compressed that looks identical to the original on a screen.
Music, video, images, and PDFs are all compressed to save space needed for data storage and transmission. Compression comes in two flavours: lossless and lossy.
Lossless Compression

It seems like it would be impossible, but there are ways to encode data so that it becomes smaller without removing anything that cannot be re-produced exactly when de-compressed. The most common example of this is when we ‘zip’ a file on Mac or PC. If the data was damaged in any way, then it would not be readable by our computer. The data can become smaller because there are always repeating patterns in the data that can be exploited.
Consider a text document with an often-repeated phrase. If, rather than storing that phrase as text each time, you replaced it with the number ‘1’ then you will be saving data (compressing). When you re-construct the document by replacing the ‘1’ with the original text (decompressing), then you have compressed and decompressed without losing any data and it has been compressed losslessly.
There are lossless compression image formats such as TIFF and PNG which are used commonly by designers that do not want to lose any image quality. But there are unfortunately limits to how much compression you can get in this way, perhaps only cutting the file size in two, which is why the industry standard is to use lossy compression schemes such as JPEG.
Lossy Compression
Most images are compressed with JPEG, which is a lossy compression format. Lossy means that in addition to the methods used by lossless compression above, some of the data is thrown away in the process. When you decompress it, it’s not exactly the same.
The algorithms used to do this are very clever at working out which data it can throw away without you noticing too much. Lossy compression will save much more data than lossless: it’s not uncommon to remove 90-95% of the data without impacting quality too much. Lossy compression is used for all streaming videos, MP3s, and images.
JPEG Format
So how does JPEG know which data can be thrown away? After all, if you get rid of part of an image, you’ll notice the gap, right?

JPEG Compression - Very little information is needed to recognise an image
JPEG uses some pretty high-end maths to convert the image from the actual pixel data into a set of frequencies. Details of what this all means is beyond the scope of this article.
All you need to know is that when an image is transformed into a bunch of frequencies, the low frequencies tend to be large areas of the same colour. The high frequencies are the ‘edges’ in the image.
Turns out, some frequencies are less detectable by humans, so you can really reduce the amount of data used to represent them. So, when the image is decompressed, we don’t notice much reduction in image quality. Clever, huh?
JPEG Quality
The amount of frequency data that gets dumped is determined by the JPEG ‘Quality’ setting. Using this control, you can get a great reduction in size with almost invisible reduction in quality.

Quality 100%. Image data 450Kb

Quality 25%. Image data 150Kb

Quality 0%. Image data 70Kb
As you can see, even at Quality 100, there are still artefacts around the edges. This is a weakness of the JPEG algorithm. It’s why it is never be used for medical, design or other critical applications.
At 25, there is a blockiness creeping in, but by this point we’ve removed two-thirds of the data compared to Quality 100. Impressive!
At 0%, while we’re now only running on a fifth of the data, it’s clear that this image is not really usable. Another trait of the algorithm is that quality drops off a cliff when pushed too hard, so be careful with that Quality slider!
Never re-edit a JPEG
The JPEG algorithm gets rid of all the image information that we can’t really see. You can tweak brightness, contrast and saturation a little bit, but if you so much as try to lift the shadows in a JPEG, you’ll find that you end up with a mess. That’s because JPEG may have removed all the detail in those sections of the image. Go back to your original RAW, edit it there, and re-create the JPEG. This time, the JPEG algorithm knows that it can’t remove that image detail, as it’s visible, and it will focus its compression elsewhere.
You should also not encode a JPEG more than once. It will work, and will reduce the size further, but you are harming the quality of the image. You’re better off running it once with a more aggressive Quality setting.
JPEG mini
There are tools around that will work even harder than the standard JPEG algorithm built into Lightroom. Most JPEG compression engines are concerned with speed of compression rather than the overall size, because they were created when computing power was much less than it is now. JPEG Mini will take your JPEG, throw some serious computing power and some even cleverer maths at your image, and remove even more data before re-encoding it at half the size as a JPEG.
Colour Space
This is again one of the areas that I recommend you leave alone. Colour Space refers to the selection of colours that are available to your camera. The default, sRGB, means that all colours must be made up of a combination of three colours: red, green, and blue. This is the format supported by all monitors and is therefore the best option. AdobeRGB was developed to allow high-end printers to take advantage of more colours. Technically it’s better, but support is lower, so stick with sRGB.
The Facebook Compression Myth
I have read many articles about what resolution to use for Facebook and instagram, and talk about an idea setting that will cause Facebook to present your images in their original form. All untrue.
Here is what Facebook will do with your images:
Re-compress them hard using an image compression algorithm. This MAY be JPEG based, but it might not… there are other image formats (wavelet-based, don’t ask) that use even less data than JPEGs but are not as widely used. They will do this because they want to minimise the space they need to store the world's images and also want pages to load quickly for good user experience, and logically, if you or I were running Facebook we’d do the same. But, Facebook also wants to ensure no perceivable loss in image quality so their algorithm will ensure things look virtually the same.
Re-size. Again, Facebook do not want to store a huge 24MP version or an image that you’ve uploaded so it will re-size it to the largest it will need. This may well be 2048 pixels, but they may also create several versions of different resolutions, because if a device is lower in resolution, as we saw above, there is no point sending an image larger than this as it will just take longer for no gain in quality. They may even use a proprietary image format that allows any resolution to be created immediately based on the larget device. That’s what I’d do, but who knows really. No-one.
So the important takeaway is that Facebook will ALWAYS compress your images and if they are larger they will resize it. But the good news is that they will do so in a way that preserves image quality.
The only way you might fall foul of this lot is if you use an image that’s too low a resolution, then Facebook will need to upscale which as we saw above will reduce sharpness.
So just send Facebook the best image you can and let it do the rest. After all, Facebook will be better at compressing and resizing than Adobe Lightroom for it’s own platform. Also don’t upload low quality JPEGs, as when Facebook re-compresses it, it will get a bit worse.
I have never seen any of my images of Facebook look any different than they do in Lightroom.
Lightroom Settings Panel
So how does all this theory get used in the Lightroom Export Panel? Here’s how:
Lightroom image sizing options
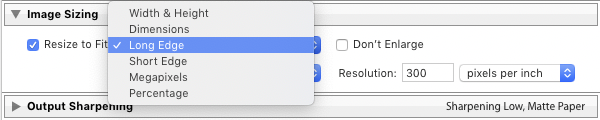
Adobe Lightroom Image Sizing Panel
This section of the export dialog allows you to change the size of your exported image to make it smaller than the full-resolution version you have in Lightroom. Resizing can be done a number of ways:
Width & Height:Use this when you know exactly which dimensions you want. You will need to manually ensure your aspect ratios remain correct, though.
Dimensions: No-one knows what this does or how it’s different from above.No-one, I tell you!
Long Edge:You tell Lightroom what size you want your longest edge (horizontal for landscape, vertical for portrait images) and it ensure that the smaller edge is correct for the image’s aspect ratio. This is the most useful for me.
Short Edge: As above, but with the shorter edge.
Megapixels: You tell Lightroom how much data you want in the image and it will shrink it to fit that requirement. Can’t think of why you would want this.
Percentage: Useful if you want to make all images smaller by the same proportion, but be careful as you’ll end up with differently sized final images if you start with differently sized originals.
If you specify a size larger than the original image, then Lightroom can increase the size for you. Again, be careful with this as you are not gaining any more photo. You’re just stretching your image. Lightroom does this using an algorithm that will look at two original pixels, interpolate what might have been between them and puts that value there. In doing this, it softens edges.
Resolution
Resolution is the most misunderstood setting on this panel. The thing to remember is this: When you have specified ‘pixels’ in the above options to resize your images, then this option does nothing. Nothing at all. For all electronic use, and 99% of print uses, it’s irrelevant. You can test this: export an image at 3000x2000px (or whatever) with both a resolution of 1 and 1000, they’re exactly the same in every way. I think it should be greyed out when you’re dealing with pixel values (i.e. pretty much always) as it confuses people.
The only time this field is really used is when you specify your desired size in inches or centimetres. In this case, Lightroom needs you to tell it what PPI it should use so it can do the maths and work out what the pixel size should be. But you should never really need to do this.
File Settings: Format and Quality

Adobe Lightroom Export File Settings
There are a variety of options for Image Format. There are options to export a DNG (Adobe’s RAW format) or TIFF (very high quality), which is lossless and useful where you don’t want to sacrifice any image quality and can deal with a larger file size. Generally, the most common option is JPEG.
If you select JPEG, the lossy compression format, you have a couple of ways to tell the algorithm how aggressive to be:
Quality: By giving a value of 0-100, you can decide how much data to throw away. I have found that 75% gives a good reduction in file size with no perceptible difference in quality on a normal display size.
File Size: You can give the algorithm a target and let it do what it needs to do to get the file to the specified size. This is useful when you need to sacrifice quality for a smaller file size (i.e. load time), which you might want to do when posting blog images, for example.
Final Words
Your images will be used for a variety or electronic and print purposes, and as shown in this article you need to consider each of these independently when deciding on the export settings in Lightroom.
Images sent to be printed should be the best possible quality as speed is not an issue. But for electronic purposes, they need to only be good enough for the size at which they will be displayed, and this is where smaller resolution higher compression is important. Anything more risks slowing down the viewing experience and possibly the SEO of your website.
Cheat Sheet
Here are the settings I use…
For final delivery…
I want the best quality JPEGs of sufficiently high resolution so clients can print:
Image Format: JPEG at Quality of 90, no file size limit
Colour Space: sRGB
Resize: Long Edge of 6016 Pixels
Don’t Enlarge: Checked
Resolution: Doesn’t matter
Sharpen For: Matte Paper
Amount: Standard
Extra Steps: JPEG Mini
For Facebook and Instagram…
These platforms will probably resize anything over 2048px, and will compress it hard. So, I want to ensure my image is about the right size (just for speed of upload), and that the quality is high so that it does not get compressed hard twice which will affect the quality":
Image Format: JPEG at Quality of 90, no file size limit
Colour Space: sRGB
Resize: Long Edge of 2048 Pixels (but can be larger)
Don’t Enlarge: Checked
Resolution: Doesn’t matter
Sharpen For: Screen
Amount: Standard
Extra Steps: JPEG Mini
For my website…
Opposite to the above, Squarespace will create different size images, but doesn’t compress them further. So, in this case, I want to compress it myself so that the files served to the client device are as small as possible to increase my SEO:
Image Format: JPEG at Quality of 60, no file size limit
Colour Space: sRGB
Resize: Long Edge of 1500 Pixels
Don’t Enlarge: Checked
Resolution: Doesn’t matter
Sharpen For: Screen
Amount: Standard
Extra Steps: JPEG Mini, then TinyPNG to really squash them for better SEO
Originally written by Nick Church for ShotKit.com here: https://shotkit.com/lightroom-export-settings/